Photographing the northern lights at Christmas time is a wonderful project. In the Lyngenfjorder Alps, high in the north of Norway, it is quite lonely at Christmas and at the turn of the year. The summer houses are decorated for Christmas, but stand empty and live up to their name. During this time, the sun no longer reaches the horizon when it rises and it is only a little brighter around noon before the blue hour quickly strikes.
These are good prerequisites for photographing the northern lights. The Lyngenfjord is already almost at the 70th parallel, so close to the polar magnetic field funnels through which the plasma of the solar wind (especially hydrogen and helium ions and free electrons) can penetrate to the earth's atmosphere, as the magnetic field funnels not only reach the atmosphere here but also penetrate it. Depending on the speed of the solar wind and the number of solar wind ions, these can now stimulate nitrogen and oxygen atoms in the high atmosphere and thus generate luminous phenomena in the sky, which are commonly called polar lights. In the North Pole regions they are also called Northern Lights or Aurora Borealis and at the South Pole they are called Southern Lights or Aurora Australis.
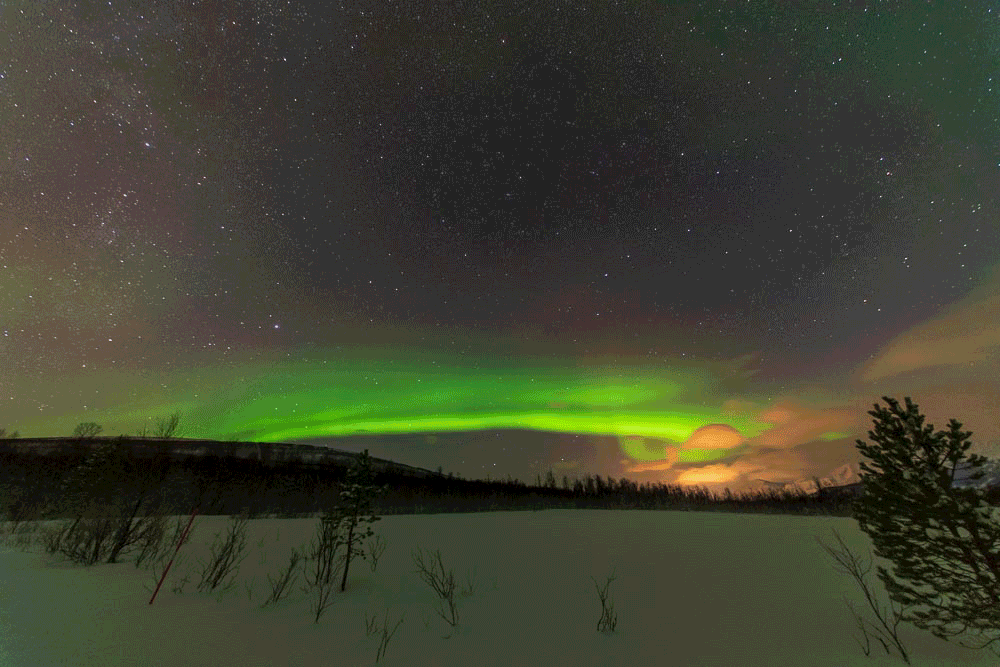
Northern lights appear in different colors. If oxygen atoms are excited at an altitude of around 100 km, they emit green light (557.7 nm wavelength). Since the sensitivity of human eyes is highest in the green area, auroras are predominantly perceived in this color. However, if oxygen atoms are excited at an altitude of 200 km, they also emit red light (630.3 and 636.3 nm). When the solar wind is strong, nitrogen atoms are also excited, which then generate violet to blue light (427.8 nm and 391.4 nm). What is actually seen depends heavily on the intensity, the degree of darkness and the color resolution of your own eyes.
Especially at the beginning of the appearance of the northern lights, it is possible that no colors are perceived. But how do you distinguish aurora borealis from clouds in these cases? The geometry is helpful here, as the auroras migrate in parallel bands from the north and south poles towards the equator and thus clearly differ from cloud formations. If you see such structures in the sky that appear colorless, then the sensors of modern digital cameras help, which are able to elicit their color components from the pale white structures, so that you can see the whole blaze of colors even with weak appearances at least when looking at the pictures. The following photos, for example, show the initial band structures that dissolve into mighty red, green and blue-violet structures in the course of the hike in front of the starry sky.
The shots of the northern lights must be carefully prepared, "snapshots" are likely to be the exception. The above-mentioned aspects already show that the chances of getting good pictures increase when you travel far to the north of the world. Iceland, Norway and Finland, for example, offer "good" latitudes for such photo projects - even if corresponding light phenomena can be observed further south as far as Germany. The sample recordings were taken at the Lyngfjord near the 70th parallel in Norway.
If the "where" is known, the next thing to answer is the "when". Strong sunspot activity is a good general prerequisite, but the so-called KP index (planetary index), which is a measure of geomagnetic activity on a scale from 0 (low activity) to 9 (high activity), helps for a more precise prognosis for the occurrence of polar lights is. It is recorded by a worldwide network of geomagnetic observation stations, made available in real time and archived - e.g. by the Adolf Schmidt Observatory for Earth Magnetism of the German Research Center for Geosciences in Potsdam. There are corresponding apps for both Apple and Android smartphones (e.g. to be found under the term "Aurora") that not only display the KP value but also other parameters that are useful for predicting the likely occurrence of auroras. From a KP value of 4, for example, it is likely that auroras can be seen and the KP value prognosis also shows the optimal time in the night (or in the dark). Some apps also have an aurora alarm, so that you can conveniently be notified with a time interval to the event. In the example recordings shown, a KP value of 4 was forecast for 10 p.m. on December 25, 2021 and the occurrence of auroras should be expected from 9 a.m. - it was true.
A good KP value is one thing, a good view of a starry sky is of course the other essential aspect, so that in addition to a suitable KP value, a good weather forecast is a prerequisite for the planned recordings.
In addition to a good tripod, a bright wide angle with the shortest possible focal length and a digital camera with the lowest possible noise sensor at higher ISO numbers, the equipment also includes a lens heater. The lenses fog up quickly at low temperatures and it is difficult to achieve a good recording rhythm, to take time-lapse recordings or to make films if you constantly have to clear the lenses.
It makes sense to check the location of the photo in the light for suitability and, if necessary, to make recordings of the composition in the light, which can then be combined with the recordings of the northern lights in the dark. We didn't do that because we were mainly interested in the northern lights. If possible, RAW should be selected as the recording format in order to be able to resolve more colors with 12 (16) bits instead of 8 bits as with JPEG in RAW format. With the JPEG format only 256 colors per color channel (red, green and blue) are differentiated with 8 bit, while with 12 bit already 4096 and with 16 bit even 65536 different color tones are resolved. (For example, the Nikon D850 captures 12-bit colors when saving in RAW format and converts them to 16-bit. When saving as JPEG, the image is reduced from the recorded 12 bits to 8 bits.)
When the time has finally come, you can see the aurora borealis in front of the starry tent and the camera is set up and aligned, then the next step is to focus optimally on the stars, as setting to infinity on the lens scale occasionally does not lead to success. The wide angle lens I used here has two advantages, on the one hand it locks into place on a calibrated infinity setting and, just as important, a locking mechanism to prevent the distance setting from being accidentally changed. This can easily be happened in the dark and for astronomical recordings I earlier used to fix the set lens with adhesive tape, which is then omitted with this lens.
If the stars have now been focused (the hyperfocal distance helps when objects in the foreground are included), it is important to choose a suitable exposure time / aperture / ISO combination. Even if many recordings of auroras give the impression (especially if they are not photos but pictures where the foreground has already been taken in the light and subsequently inserted with an image editing program) that the auroras turn night into day - that is not so.
There are often weak light phenomena that require long exposure times despite the aperture being open in order to keep the ISO numbers as low as possible. However, you cannot expose for as long as you like, because the point-shaped stars become lines due to the rotation of the earth. What is desirable for startrail recordings has a rather disruptive effect here. The so-called 500 rule may help: 500 divided by the focal length of the lens results in the longest exposure time at which the stars still appear as points in the picture. With a focal length of 20 mm, for example, there is a maximum exposure time of 25 seconds. With my focal length of 11 mm, the maximum exposure time is 45 seconds. Practice quickly shows that this rule of thumb is better to be checked with test images. It is better to also include the properties of the camera used (sensor size, pixel density, aperture). There are again useful apps for smartphones that calculate more precise values - PhotoPills calculates, for example, 23 seconds for the 11 mm lens used here, i.e. half the value of the 500 rule of thumb! The sample shots were all taken with 30 seconds, as this led to good results at ISO 1600.
You also have to consider in advance whether you want to create photos of the northern lights or compositional images. If the latter is planned, you should choose several places for the forecast weather / KP index optimum at night, especially in mountainous regions, with a distance of several kilometers if necessary, but which can be easily and safely reached within the time window - auroras can be forecast well - but unpredictable.
The dynamics of the northern lights are of course impressive, so that video recordings can also be used as a supplement to photographic recordings. One then encounters the difficulty of having to work with long exposure times and high sensitivities for individual shots. If you want to create smooth film sequences e.g. in PAL mode, 25 frames per second are necessary. In the NSTC standard there are even 30 (29.97) full images per second.
There were only 1/25 second in Pal and 1/30 second in NSTC format left for the longest exposure times. If you consider the above exposure time of the individual images of 30 s and ISO sensitivity of 1600, you can see that this is not feasible. One way to capture an impression of the aurora borealis movement is to create gifs like in the following example. In doing so, one consciously accepts the recognizable transitions from picture to picture.
If you now increase the number of individual shots and reduce the exposure time to just possible values, the advantage of the raw format becomes apparent, because in post-processing many details and tonal values can be generated from the 16-bit images despite the exposure time being too low, which would be lost with JPEG recordings. In this way, smooth video clips can be created.
The final video at the end of this article consists e.g. of 274 individual shots, each with an exposure time of 8 seconds, which were post-processed in Adobe Lightroom and exported as JPEGs. The resulting mp4 video from all JPEG recordings thus compresses the entire recording time of 2192 seconds into a film clip of 11 seconds and already looks quite fluid.